Technology was a huge help on this trip, and I did a LOT of advance planning in this regard. I wanted my tech toys to be helpful and useful but not get in the way.
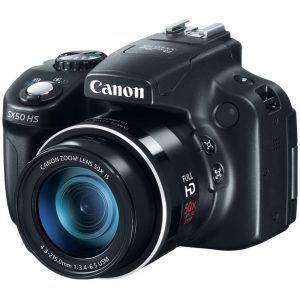
- Camera. I bought a new camera about six months ago, with this trip in mind. I wanted something a little better than the typical point-and-shoot pocket camera, but I still needed it to be easy-to-use and not too heavy or bulky. I’ve always been a fan of wide-angle lenses, especially for landscape and building shots. I ended up with the Canon SX 50 HS. It has a wide angle lens plus a 50x zoom. It is a little bulky, and you have to deal with a lens cap, but I am very happy with the quality of the pictures. It can take High Dynamic Range photos if you can stabilize the camera with a tripod or set it on a surface – love them!
- Eye-fi card. Have you heard of these? It’s an SD card for your camera, but with a built-in wi-fi chip. You can configure the card to automatically upload to the cloud when you’re connected to wi-fi or, in my case, I configured it to upload photos to my iPad. At the end of each day, I transferred that day’s photos to my iPad just as an extra back-up – and also just for viewing them in a larger format. Plus, it was handy for blogging to have the photos on the iPad’s camera roll. I got the 16MB version – more than enough storage space for this trip.
- iPad. I love my iPad. It’s a 16MB wi-fi only iPad 2. In addition to using it for photo back-up, I also loaded up my entire genealogy archive for reference while travelling – the equivalent of an entire file box. It was GREAT to be able to look up stuff, look at church records, look at photos, and so forth. I read out loud from the Aspengren diary at one point – so neat to be able to read about the historical event while you’re sitting at the historical place! At the bottom of this post, I’ve listed the apps that I used. I could have used a model with more memory – I ran out of space for photos toward the end of the trip and I had to start jettisoning some of my reference files.
- Garmin. Obviously, you can order a Volvo with a built-in navigation system. Dad opted not to and instead got the Scandinavia card for his existing portable Garmin. I think it cost $50 or so. He also already had the car mount for it. Dad pre-programmed all our lodging locations and other destinations. The Garmin has greater detail in it than any road map that we found and we were glad we had it. The only drawback is that when you’re focused on the Garmin, you’re not attentive to the road signs and you easily lose your sense of direction. The roads signs in Sweden are really good.
- Road atlas. Even with the Garmin, it was great to have a general purpose map at our fingertips, just to get a sense of the big picture. Dad had a road map for all of Sweden, and I had an atlas that had greater detail. The atlas (Motormännen Vägatlas, has a red cover) is the same one the locals use.
- iPhone. I bought Verizon’s international data plan ($25 for 120MB data, discounted voice calls). Some of our B&B’s had sketchy wi-fi, so I used more of the data than I thought would be necessary. I ended up buying two more data blocks. In addition to some travel apps (see below), I used my phone to check on news and emails from home. I used the Google Translate app a LOT. It was really handy if you just needed to know what a word on a sign meant, for example. Dale had a voice package on his phone (AT&T) so we used it to call home once in a while.
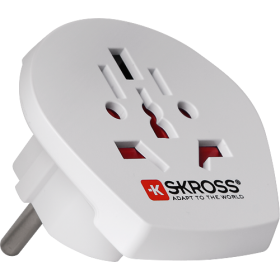
- Charging. The car chargers were our principal means of getting juice into the phone and the iPad. When we needed to charge at night, we used an adapter like this for our wall chargers (available at any Clas Ohlson hardware store):
Here’s a list of the must-have apps for this trip.
For iPhone
- Google Translate (free) – worth buying your phone’s data plan just to have this
- XE Currency (free) – great for quickly converting kronor to dollars and vice versa.
- Trip Wallet ($1.99) – I kept track of our expenses on this, I really liked it.
- Tripit (free) – keeps all of your official itinerary data (flight numbers, confirmation numbers, etc.) in one place.
For iPad
- Documents (free) – this app was released shortly before our trip and I am SO GLAD I found out about it. On my desktop computer, I converted entire genealogy file directories to zipped files, then transferred them via iTunes to the iPad. Once inside the Documents app, I unzipped the files and ta-da – my entire file structure right there on my iPad. After unzipping, I then deleted the original zipped files to make more space available on the iPad. Most of my genealogy archives are in PDF and JPG formats, and Documents can read these (and several other formats) with no problem. HIGHLY RECOMMENDED.
- Families for iPad (14.99). This is the mobile app that syncs with my desktop genealogy program (Legacy Family Tree). I absolutely love Legacy. Their mobile app is okay but not great – it does everything it’s supposed to and it’s super handy to have all the names and dates with you. I just wish the user interface was better and their screen displays were more attractive.
- Posts (free). This is the app I used to create blog posts on the go. My blog is in a self-hosted WordPress installation, and the Posts app is pre-configured for WordPress. It has a few little quirky things that I hope they improve on in future updates, but I thought it was excellent given that it’s a free app.
- Skype (free). Great for checking up on the kids if you have wi-fi.
I just can’t say enough about the value of an iPad for a trip like this. Travelling with a laptop is so last-century!


